

"I never had any other desire so strong, and so like to covetousness, as the one which I have had always, that I might be master at last of a small house and a large garden.”
- Abraham Cowley
French Eden
Gardening…cooking…frugality…retirement,
I am not truly enough of an expert to write an authoritative book about any of
these topics. Well, maybe frugality…I can claim to be a parsimonious tightwad
without much danger of hubris. There are many books written on each of these
topics by persons far more knowledgeable than me and I will gladly name some of
their works throughout my writing. Rather than look at gardening, cooking,
frugality and retirement individually, what I hope to accomplish is to join
these four topics to each other and demonstrate how they can constitute a
holistic lifestyle…a holistic and happy retirement…the “good life.” “Holistic,”
now there is a 50-cent word if I ever used one! What it means is that the
various symbiotic parts are harmoniously integrated in such a way that the
resultant whole is more than the sum of the parts…that somehow it all works
together. That is the story of my own retirement; obviously a lot of us
retirees want to have a good time in retirement but many of us didn’t get
enough saved, so frugality is a fact of life that goes with our retirements.
Growing our own food and cooking what we grow, are tied into reducing expenses
and frugality. Gardening and cooking give us ways to engage positively with our
spouse and pass the day without boredom or expense. You and your spouse are
going to spend a lot of time in close proximity in retirement …compatibility of
egos is key to a good retirement. “If momma ain’t happy, ain’t nobody happy.” My
advice is to make yourself a humble peeler of vegetables and dish washer when
it comes to the kitchen and to stay out of her flower and herb garden.
Gardening gives us daily exercise and sunshine and that relates to good health;
less expenditure on healthcare saves money and that relates back again to
frugality. So I will describe my own retirement and how these four topics have
interrelated in my experience. I view the “good life” as a cottage surrounded
by gardens and gourmet meals cooked with my wife…a French Eden.
When I
asked my grandma what life was like during the Great Depression, she answered,
“We were poor but we were happy.” Answering the question, is this possible to
be both poor and happy, has become my goal. As good paying jobs are taken over
by robots, computers, and artificial intelligence, it is likely that the
disparity between Haves and Have-nots will increase. As the limited area of
agricultural land is ever subdivided amongst an ever larger population and the
poor are stacked and layered in decaying cities, it is likely that Thomas
Malthus’ prediction of war, famine and disease will occur. It was because of
him that economics received it label as “the dismal science.” Can the idle
hands and the disenfranchised find happiness and meaning or only mischief and
mayhem?
 |
| Spring garden |
Garden Talk
I am a retiree. I live in rural Gibson County,
Indiana and I love to organic vegetable garden. My soil is a very sandy, well-drained,
early warming soil, even naturally growing prickly pear cacti. Therefore any
recommendations I may make, especially with regard to planting and harvesting
dates, probably would not apply to gardeners with other soil types, especially
those with heavy clay soils which are much slower to heat up in the spring and
can be badly damaged by cultivation when cold and muddy. My garden is 50’ x
50’, about 2,000 sq. ft. of vegetables if I subtract out the aisles and walking
paths. This garden consists of a dozen 50’ long x3’ wide rows or gardening beds
each with a 1’ wide access path. This garden is small enough to fit in the back
yard of many suburban and some city lots if that backyard is sunny. It is also
small enough that I can garden it using only hand tools, (a rake, hoe and long
handled shovel) the secret being I only dig one of the twelve rows per day and
not the entire area at one time. If I
were to buy a $600 rear tined tiller to get the job done in one day and then
sit in the garage the rest of the year my vegetables would suddenly become too
expensive to make any economic sense and I would lose my garden quiet time and
morning workout on sunny February and March days.
I want to talk about a much smaller 12’x16’
garden, only about one tenth the size of the garden that I usually grow and to
use my plan for this “Postage Stamp” garden to illustrate 13 intensive and
organic practices to maximize the vegetable output from a small area. I became
interested in these small garden techniques last year when I read The
Postage Stamp Vegetable Garden by Karen Newcomb. Such gardens will fit more easily into
city-dwellers’ back yards and are more relevant to beginning gardeners whose
chances of success will be increased if they start small. Let’s look at some of
the advantages of this smaller garden in comparison to my larger garden: fertilizer and compost can be more
concentrated and better increase the soil fertility, one tenth of the city
water is needed to irrigate the garden, one tenth of the time and labor are
required to keep up the garden and probably most importantly for the beginning
gardener, weeds and grasses can be controlled and stopped from overwhelming the
garden with just a few minutes of hand weeding and hoeing per evening. Following is a diagram of my postage stamp garden.
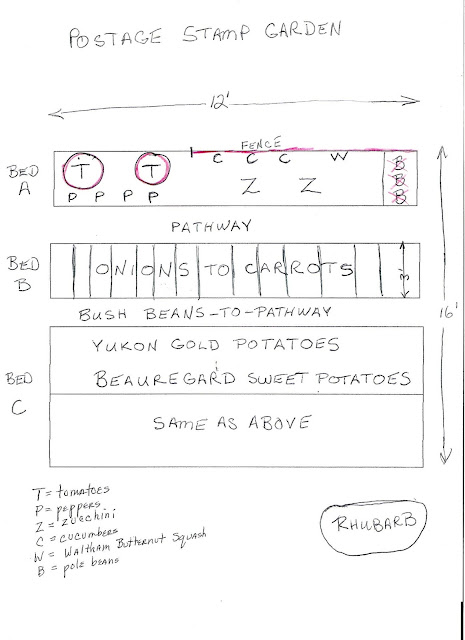
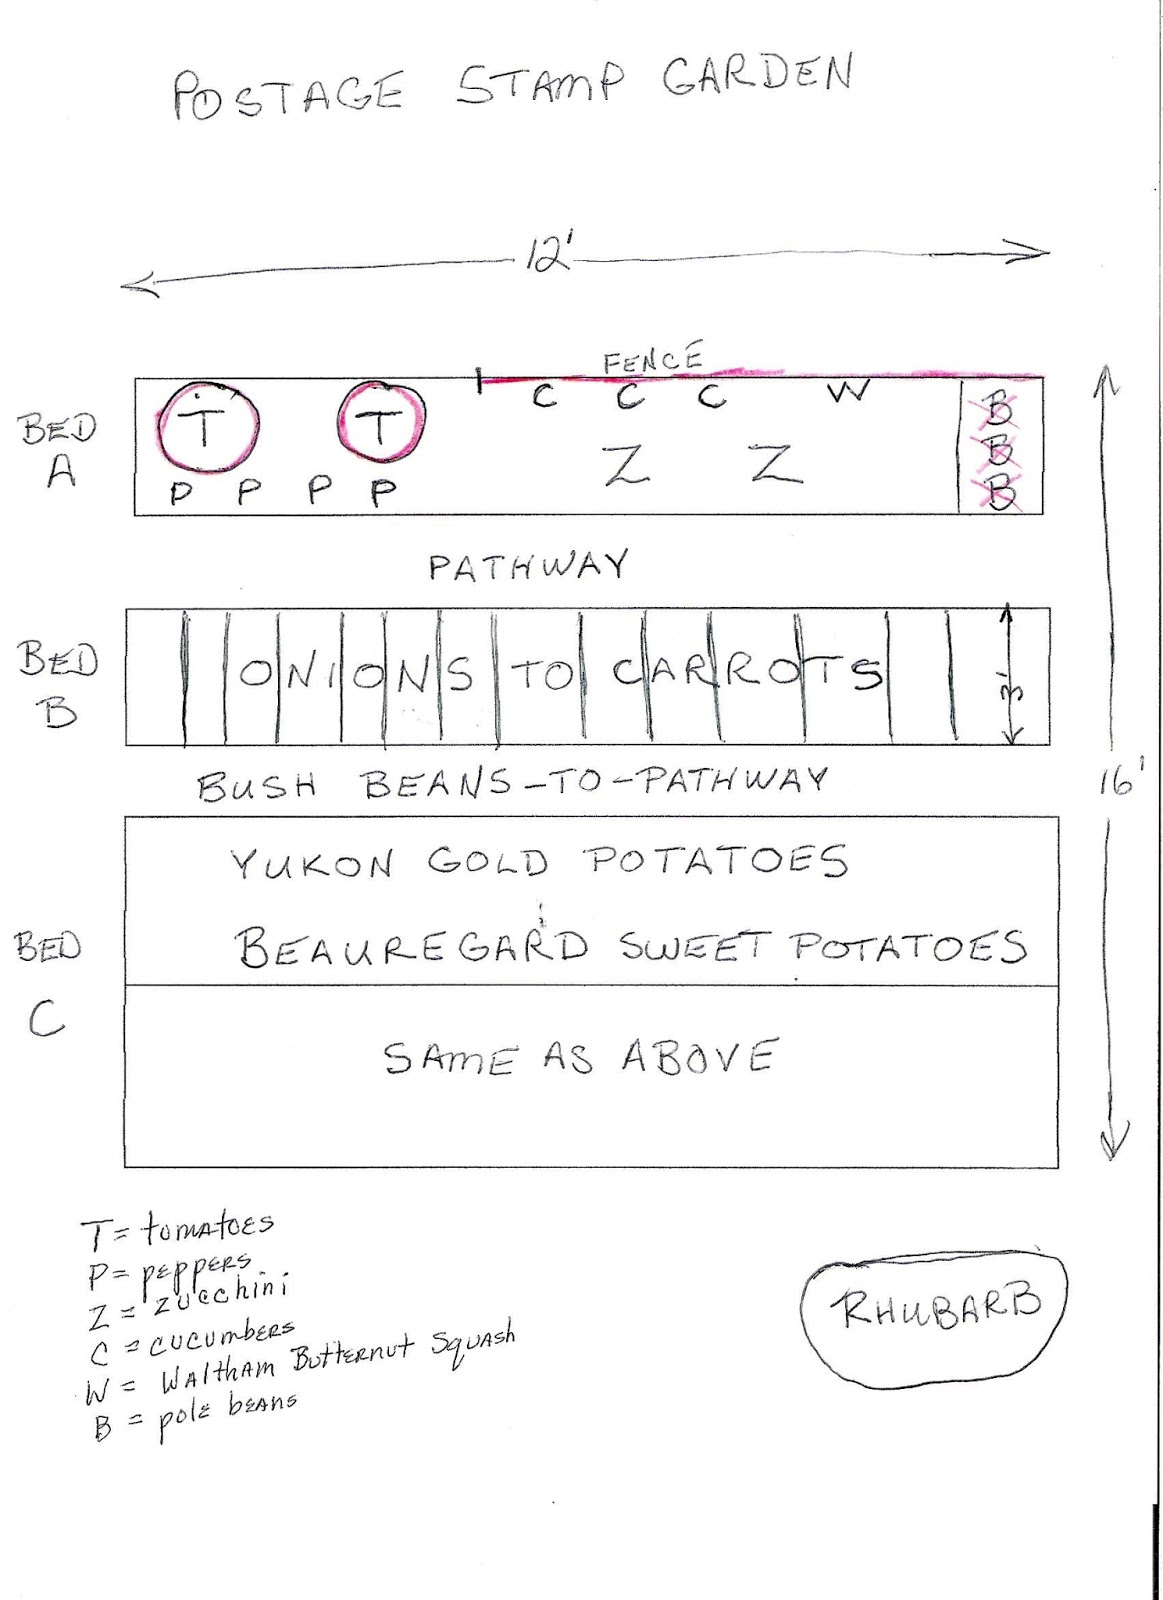
Let me
begin by describing the postage stamp garden plan and then enumerating the 13
intensive gardening practices to maximize gardening output which will be
illustrated by the garden diagram. The garden consists of three vegetable beds
“A, B, C” and a couple rhubarb or pie plants planted off by themselves. Bed A
measures 3’x12’ and is made up of prolific plants, some of which are planted
vertically in cages, on a fence and up poles. This bed A could be considered a
micro garden in itself for those who want to begin with a garden even smaller
than the postage stamp garden. The first six produce-maximizing practices will
be explained in terms of this bed A. Bed
B is also 3’x 12’ and will be used to grow onions followed by carrots. Bed C is
6’x 12’ (actually two repeating 3’x12’ beds joined together without a
separating access path); this bed C is a “potato patch” with white and sweet
potatoes growing together.
The 13 garden produce maximizing intensive/organic practices
illustrated by the postage stamp garden’s three beds are:
(1) variety selection
(2) prolific plants
(3)vertical gardening
(4)wide rows and raised beds
(5)making prolific plants more prolific
(6)spring-summer-fall succession planting
(7)mulching
(8)companion planting
(9)slow/cool composting, sheet composting, deep mulching
(10) fast/hot composting
(11)cover crops/green manures
(12)pre-planting weed controls
(13) crop rotation.
Because some of these gardening
practices can double and triple garden output per area, a small postage stamp
garden can produce a great amount of food in a small space. Now I will
illustrate sequentially each of these 13 intensive gardening concepts in the
context of these beds A, B, and C.
The
capital letters shown in the diagram of bed A indicate the location of summer
vegetables grown in bed A; T stands for tomato, P for bell pepper, C for
cucumber, Z for zucchini, W for winter squash and B for pole bean. The red in
the diagram shows the vertical structures (wire cages, wire fence, and wooden
poles) which some of these vegetables grow on or in.
Practice#1.
One way to double the output of your garden is to find a superior variety
particularly adapted to your soil type and climate. When gardeners gather they
do not say “I am going to grow tomatoes in my garden.” Gardeners talk in terms
of what varieties they consider best and say, “I am going to grow a Celebrity
or a Better Boy or Early Girl.” How do we find these superior varieties? One
way is to ask a knowledgeable experienced neighbor who is familiar with your
particular soil type. Last year I asked the fellow who runs our local recycling
center, “What is a good tomato to grow in sandy soil?” He told me to try Pink
Girl. I took his advice and the Pink
Girl far out-performed any of my other dozen tomatoes. Another way to find a
superior vegetable is to check the seed catalogues for AAS winners (All
American Selection winner). Another way
to find a superior vegetable variety is to find out what most of the professional
vegetable farmers plant; since this is their livelihood, vegetable farmers have
done their homework well when it comes to variety selection. My favorite
determinate tomato variety is Celebrity which is an AAS winner and is grown by
many farmers in Florida, a state with a lot of sandy soil. Likewise I have read
that 80% of all sweet potato farmers once grew Beauregards, a sure sign that
Beauregard was the superior variety. If you want to grow the most vegetables
from a small area, then continue to research and experiment with varieties.
The
second intensive gardening practice on my list is growing prolific, high-yield
plants and this is the case of almost all the plants in bed A of our Postage
Stamp Garden. Tomatoes are the favorite and often only garden plant that
Americans grow. Part of the reason for the tomato’s popularity has to be that
the tomato plant puts out so much fruit for its grower. One grower in
Mississippi grew over 200 tomatoes from a single indeterminate vine so it
should not be too much to hope for to try to grow 50 or so from a main-season
Jet Star or Pink Girl and 30 from determinate Celebrity varieties. Likewise the
zucchini, cucumber, bell peppers, and pole beans are all naturally prolific
plants grown in the micro garden I am calling bed A. Consider that when you do
your weekly grocery shopping in the fresh produce aisle you might grab a couple
cucumbers, bell peppers, zucchinis and half a dozen tomatoes for the up-coming
week but a single one of those plants in bed A can produce such amounts in a
single day. We will need to change our eating habits and eat more vegetables in
our diet and store some in our freezer for winter use at the rate that these
naturally prolific plants produce.
The
third intensive gardening practice which is illustrated by bed A in our postage
stamp garden is vertical gardening. We have tall plants growing on the north
side of our garden (where they will not shade out shorter plants); these vining
plants grow in cages (tomatoes), up fences or trellises
(cucumbers, winter squashes) and up poles or strings (e.g.
green beans). This practice of vertical growing has been compared to
skyscrapers in population-dense big cities which take up no more ground area
than a one story office but hold a hundred times more offices and people
because they rise a hundred floors high over their relatively small ground
space. A couple cucumber plants if left to sprawl on the ground might well
cover sixteen square feet of space but if grown vertically the same two plants
need only one square foot of room for their roots. Likewise a sprawling tomato
that might cover nine square feet would only require a couple feet of space if
caged and one square foot if staked. The tomatoes would also be much healthier
with fewer lost rotten fruits if grown in the air rather than allowed to be in
contact with the soil, thus further increasing output from each plant.
The
fourth intensive gardening practice illustrated by the postage stamp garden is
wide-row gardening. As a tip of the hat to flower gardeners I refer to the wide
rows in my garden as “beds” because flower gardeners have always planted their
plants in wide, thickly planted beds (or rows) rather than the narrow straight
single-file rows with wide walking paths on either side which are typical of
the traditional vegetable garden. The garden literature indicates that this
switch from furrow planting to wide-row or bed planting can quadruple output
per space in a vegetable garden. Wide-row gardening is often associated with
raised bed gardening (which might improve drainage and allow for earlier
planting for a gardener with heavy clay soil) but in fact a wide-row practice
could just as easily be associated with a trench for the gardener with sandy
soil who wishes to get his plant roots closer to soil moisture. So I see no
necessary connection between wide-rows and raised beds, the latter of which
relates more to soil types and the preferences of particular vegetables, e.g.
the preference of sweet potatoes to grow on ridges. Now let me ask a couple
relevant questions. When you walk on a path, through a field or woods, how do
you know where the path is that you are walking on? Answer, the path soil is
bare, devoid of vegetation. Why is the pathway bare? Because the path soil has
been compacted by people walking on it. The lesson learned is that compacted,
walked-on soil does not grow vegetation or vegetables. Therefore once prepared,
never walk on or step foot on your wide row garden beds or your vegetable
output will be greatly decreased.
The fifth
gardening practice we are interested in is using techniques which make the
naturally prolific plants in bed A even higher yielding. One technique is to
pick vegetables immature and often. If a zucchini is allowed to grow to
maturity it may grow to 18 inches long and as big around as a baseball bat;
likewise a cucumber can grow to 10’ long and two inches in diameter, but such
mature fruits signal the plant and roots that they have fulfilled their mission
in life and can now stop producing offspring. If the same zucchini and
cucumbers were picked at 8 inches or less the plants would continue to produce
fruit. If tomatoes are picked when they are large but still pale green and
allowed to ripen in the kitchen rather than on the vine they will escape much bug
and disease losses since the unripe tomato is a somewhat toxic plant attacked
only by the horned tomato worm, a pest which can be controlled by hand picking.
Pole beans are more tender and continue to produce longer if picked before the
beans show through the pods. Only the butternut winter squash needs to be left
on the vine to mature.
A second technique for making plants more prolific is
pinching or pinch pruning. By pinching off the growth tips of vining plants you
basically signal the roots, (the all-important foundation of plants), to stop
producing vines and send more energy to producing fruits. Instead of sprawling
vines you get cucumbers, winter squash and green beans. Even some bush plants like bell peppers and
basil have growth buds which need to be pinched out when the plant reaches a
desired height. When planting a tomato plant, all the leaves are pinched from
the stem except the top three. The stem
is then planted horizontally in a shallow trench with only those top few leaves
above soil. The pruned and buried stem
now becomes a root producer putting down roots where the leaves once were. In
my opinion, the bigger the root system, the better for the plant. Once the
tomato plants grow to a couple feet tall small suckers begin to grow in the
crotches between the main vine and the off-shooting leaves. These suckers are
often pinched out when only an inch or
two long but if allowed to grow to eight or ten inches they can be pinched off,
dipped in rooting powder, and placed in a clear glass of water, as you would
place a flower in a vase. After a week or two the suckers in the glass will
form roots and then can be potted into clay pots of potting soil, kept well
watered and allowed to grow into free clones of the original tomato plant. For
my tomato clones I plan to clone the Celebrity variety of tomato since it has a
determinate stem and will only grow to a couple feet tall. If I plant these
Celebrity clones in my bed later they will not shade out the taller cucumbers
and pole beans.
The two
zucchini plants in the postage stamp garden will have a great deal of problems
being grown organically because of two insect pests, squash bugs and squash
borers. Squash bugs are the less serious of the two. Whenever I go to pick
zucchinis I always also check the leaves on top and underneath for patches of
the red BB-like eggs of the bug and smash them with my fingers or tear off a
bit of the leaf and discard it. The real enemy of the zucchini plant is the
squash borer which lives in the bottom six inches of the plants stem. Laying a
couple foot-long sheets of aluminum foil weighted down with bricks or stones
underneath the zucchini plants, confuses the moth which lays the worms and
seems to have some effect. Wrapping the stem itself with a nylon stocking or aluminum
foil may also help. Farmers used to grow their pumpkins after harvesting wheat
in mid-July since borer pressure eases after then. By mid-July I can expect my
two zucchini plants to be pretty well ruined by the borers. My guess is by then
I really won’t care because I will have so many grated zucchini in the freezer
that I won’t need any more. So rather than replace the zucchini with more
potted zucchini transplants I instead
will yank them and replace them with four of my Celebrity clones to assure that I have a good supply of
full-sized green tomatoes for fall storage. Tomatoes are not usually thought of
as a storage crop like root crops and winter squash are, but they will keep for
a couple months after frost if wrapped individually in newspaper and laid one
row deep in a cardboard box. There is no need to open all the newspaper
wrappings all the time to check if the tomatoes have ripened to red; just
gently squeeze each wrapped tomato. If it is hard, it’s green; if it is soft,
it is ripe. In my opinion full-sized opaque green tomatoes are greatly
under-appreciated and undervalued vegetables.
The sixth intensive gardening
practice which can be illustrated by bed A is succession gardening. The
lettered diagram of bed A shown in my garden plan represents the summer warm
weather plants which I intend to grow in that section of the postage stamp
garden: tomatoes, cucumbers, etc.
Obviously, more produce can come from this area if I both precede
and follow the summer plants with cool weather spring and fall crops; this is
what is meant by succession planting. I usually put a 60-day seed-to-maturity
limit on my cool weather plants; growing fast maturing crops is a real plus in
maximizing produce from a small area. Besides this, slow maturing spring plants
would mature in summer heat ruining their quality and fall cool crops planted
before Sept. 1st in my hot sandy soil would have to face drought,
heat and heavy insect infestation as tiny emerging plantlets. This is why I do
not grow cabbage or rutabaga, although I do make an exception for carrots and
baby them through the August heat and drought with daily watering. Mostly I
plant lettuce, spinach, white scallions from sets, and radishes around Mar. 1st
and again Sept. 1st and I plan to have these salad and cooked greens
plants harvested within 60 days. In spring I plant German Giant and Icicle
radishes but in fall I prefer Green Meat radishes which hold up to cold weather
and store well. I am a coleslaw lover
and I use grated radishes for that dish rather than cabbage which is much more
difficult to grow organically given the cabbage worms.
Now I
want to switch our attention from garden bed A to bed B which also illustrates
the succession planting technique by first growing white and red onions planted
as sets March 1st and then
followed by carrots when the red onions are harvested for drying in early
August. The white onions I tend to eat as scallions during the spring and summer but the red onions cure and
store better, lasting at least until late fall scallions arrive. Onions and
carrots are the two crops most affected by weed and grass competition and
therefore bed B can be used to illustrate intensive organic practice #7 of
mulching. Onions are challenged by weed and grass competition because they are
grown during the rainy spring season and because they do not put up enough
foliage to shade out the weeds; carrots have the problem of being very slow
germinators, so weeds and grasses are up and growing before carrots ever break
the soil. Recognizing that there will be weed competition problems with onions
and carrots I plant both in short three foot long rows spaced about ten inches
apart across bed B rather than 12 foot long rows along the length of bed B.
These short rows allow me to easily insert a sharp hoe and shave out weeds and
grasses between the rows as the young onions or carrots first emerge. I plant about four fast germinating radishes
in each of the carrot rows to mark those rows for hoeing until the carrots
eventually emerge. When the foliage of both the carrots and onions becomes too
thick to hoe the rows without damaging the crops, I fold newspaper and lay it
between the three foot long rows and then top with a couple inches of straw or
dried grass clippings to hold the paper in place. In my opinion this thin ply
of newsprint underneath effectively doubles the value and depth of the organic
mulch holding it in place. This mulch should give sufficient protection to
these two weed-prone crops while also holding moisture in the hot sandy soil.
Succession planting also plays an important role in weed and grass control.
After the onions are pulled but before the carrots and marker radishes are
planted, the soil is raked and any weeds are cultivated out before they have a
chance to go to seed. Weeds are not nearly the problem as the thousands of
seeds they create just as the first generation of garden insect pests do not do
near the damage as the hundreds of second generation eggs which they lay. In
both cases a gardener needs to get them early and kill them young. Hoeing, mulching, and raking between
succession plantings all accomplish weed and grass control.
Intensive
gardening practice #8, companion planting, can be illustrated by bed C where I
plan to plant Yukon Gold white potatoes and Beauregard sweet potatoes. I am
sticking my neck out here because I have never seen this done by another
gardener or read of it in any book. As with many things, it seems to be just a
matter of timing. The Yukon Golds have excellent taste, store well, and most
importantly in the case of this interplanting or companion planting, Yukon
Golds are fast maturing, taking about two and a half months. White potatoes and
sweet potatoes are botanically unrelated so the pests of one should not bother
the other. I want to plant my Yukons early, between March 15 and April 1. I use
small egg-sized seed potatoes rather than cut larger potatoes since this
reduces the risk of rot in cool wet soil. Potatoes are damaged by frost so if
potato tips are poking through the soil before an expected frost I simply cover
them with an inch of soil. When the Yukons grow to a foot tall, they need to be
hilled so that only a third of the plant remains exposed. As the plant again
grows it is hilled a second time to prevent tubers from being exposed to
sunlight and becoming inedible. After the second hilling the ridge is mulched
and ignored until the plant dies; death is the sign that the tubers have
reached full size and are ready to be eaten as soft skinned or “new potatoes”.
The Yukons can then be dug as needed or cured for another month in the soil to
develop thicker, tougher skins for storage.
This in-ground curing should be completed by early July.
When
the Yukons have been hilled for the second time, late May or early June, I will
incorporate some compost and form another foot tall ridge immediately in front
of the two-foot wide Yukon ridge so that the two ridges together are three foot
wide. I then will poke-plant and water-in Beauregard slips into the new ridge.
Once planted the Beuregards will not begin to spread vines for about a month as
they put down deep roots, thus allowing the Yukon vines time to die and tubers
to mature. After that the Beauregard
vines can be allowed to spread over the white potato ridges while the Yukons
are both harvested as new potatoes and cure underground. The dead Yukon vines
can be cut off to better allow the sweet potato vines to spread over the curing
Yukon ridge. It will not harm but in fact help the Beauregards if their vines
are lifted with a rake handle or broomstick to harvest the Yukon Gold potatoes.
The major advantage that I hope to achieve with this interplanting, companion
planting is the more efficient utilization of ground space because both white
potatoes and sweet potatoes are ground
hogs when planted alone; white potatoes because they need to be hilled and
because they require room for good air circulation to keep down blights ,
whereas the sweet potatoes require a lot of space for their vines to spread
out. Planted together I hope that the sweet potato vines will form a low-growing
living mulch to shade and cool the curing white potatoes in June and July heat.
My wide rows are 12 feet in length and I plan to plant two such rows in bed C.
If I plant both types of potatoes about one foot apart in the rows then I
should have about 25 plants each of Yukons and Beauregards. I hope to get three pounds per plant from the
Yukons or 75 pounds total and five pounds per plant from the Beauregards for
125 pounds total; the entire bed should yield 200 pounds of spuds.
I am
interested in year-round produce consumption from my postage stamp garden. I
imagine a clock where each numeral represents a month not an hour and consider
what will be on my plate each month. I do this with a number of different
vegetables but the white potato-sweet potato combination is one good example of
how I try to push the hand around the year clock. I should have Yukon Golds to
eat from June to the end of November. I
will harvest the sweet potatoes for storage in our cool utility room before the
first fall frost, around October 15 and eat on them until July of the following
year thereby giving me a healthy spud on my plate year-round.
Another
example of this year-round garden eating is the dessert cycle. Most people do
not associate vegetable gardens with dessert plates, but they should. The two
rhubarb plants begin providing pies and sweet breads for May and June. In July
rhubarb stalks can be thin sliced and frozen for pies during winter. From July
through the end of September, we make green tomato pies (tastes like apple pie)
and in June and July we harvest and grate zucchini for zucchini breads (tastes
like cake or brownies). There are a lot of zucchini bread recipes, some with
cocoa, some with pineapple, etc., so there is a great deal of variety. Grated
zucchini freezes easily for winter uses, including breads for Christmas gifts.
In the fall we harvest the sweet potatoes which give us sweet potato pies
through the winter, thus completing the year-round cycle of desserts from the
postage stamp garden. If you can squeeze in a Waltham Butternut winter squash
along the fence in bed A, they will also make excellent winter pies and sweet
breads.
Obviously
another way to maximize produce from our postage stamp garden is through
enriching the garden soil by incorporating soil amendments. This illustrates
the three intensive gardening practices of (9) slow/cool composting (also
called sheet composting or deep mulching), (10) hot/fast composting and (11)
cover crop/green manure. Slow composting is the no-brainer, cannot -fail method
because it is exactly what nature does with a pile or sheet of organic
material. There is no need to turn the pile or pay attention to the proportions
or timing of organic material added to the pile or sheet. Even a pile of wet
leaves will eventually rot into compost but it may take several years. Slow/
cool composting has a number of advantages over hot fast composting. It is less
work. Earthworms live in it and are part of the process, even incorporating it
into the soil. It is richer in soil nutrients, having twice the nitrogen of hot
compost. It shrinks less and adds more organic material to the soil than hot
compost. Some gardeners use sheet composting to cover and protect their soil in
the winter rather than a cover crop. They rake the deep mulch off in spring to
expose their soil to the sun for warming and then plant with little or no
cultivation (this is called the “no dig method”). Once the vegetable plants
become established, usually by mid- June, then the slow compost is reapplied as
a deep mulch to continue composting and conserving soil moisture while shading
out weeds. Slow composting or sheet composting definitely has some advantages
going for it.
 |
| Hot compost pile |
Hot or fast composting is more exacting and more work than slow or cool composting, but is finished and ready for use in months or even weeks rather than a year. Hot compost is built in layers, from “brown” or high-carbon materials and “green” or high-nitrogen organic materials stacked in a two browns to one green ratio. That two-to-one ratio is by volume not by weight. Hot compost is built all at one time and not built incrementally by adding materials as they become available as with slow compost. So I begin with a five foot square, six inch deep layer or brown material, mostly dead leaves with some straw mixed in to keep it fluffy and allow for air circulation. After I wet these browns with a hose, I add a three inch layer of green material, mostly grass clippings, young weeds which have not yet seeded, kitchen garbage, and garden culls and waste. All green material is not actually the color green as in the case of banana peels, coffee grounds, egg shells or over-ripe tomatoes; the key to green material is its high nitrogen content, not its color. After watering this 3 inch green layer, I add one inch of garden soil to inoculate the pile with the microbes which will do the composting and heating. This layering process is repeated until the pile is four feet tall. Size matters with hot compost; if it is smaller than one cubic yard it will not heat up and if it is larger than five foot wide by five foot tall, it likely will not heat up properly. Although height and width are limited, the hot pile can be windrowed to any length. Making a pile about 10 feet long is a good idea because after about a week the pile will have shrunk to half its original height and need to be turned to aerate the pile to reenergize the composting microbes in the center core of the pile. At that time the windrowed “long tail” of the pile can be flipped on top to give the height and depth again necessary for the pile to reheat. An attempt should also be made to get the outside material of the first pile turned into the center of the rebuilt pile.
Hot
compost requires more work than slow compost and cooks off half its nitrogen
but it also has its advantages. Hot
compost cooks and kills; heating kills human pathogens, plant diseases, insects
and their eggs, and weed seeds. Some mention needs to be made as to what should
not go into a compost pile. No meats, bones, fats, oils, inorganic materials,
dairy products, breads, cooked meal leftovers, human, cat, dog or hog manures
can go into the hot compost pile. So do not empty the kitty litter box or throw
diapers on the pile. Most people feel that cow, horse, poultry manures are OK.
Others feel that dog food can be used to heat up the pile. Personally I have
fears of E-coli, weed seeds, salmonella, and vermin and so I am not big on
using any manure. I probably would use rabbit manure but that is about it. I
probably do expose myself to a little salmonella risk with composting eggshells
but I make sure they get cooked in compost heat. In general I don’t mess with
manures in my compost which allows me to skip the pain of either buying or
hauling them and I therefore have a closed –loop system where I can get most of
my brown and green materials right from my own property. A smashed watermelon
rind works as good as a cow pie for heating a compost pile. There is nothing
magical which makes the manure that comes from one end of a horse richer in
nutrients than the grass that went into the horse’s mouth.
There
is a saying among gardeners that “there is never enough compost.” The reason is
that compost shrinks; it shrinks to 10% of the bulk of the original organic
material which it incorporated. A five-foot compost pile ends up as six inches
of compost. Wouldn’t it be great if there were a soil amendment which expanded
incredibly rather than shrank? There is….It is green manure. The amount of
roots that green manure grasses can add to the soil as organic material is
truly unbelievable. A single three-pound bag of annual rye grass, if planted
before October 1, will add more organic material to the soil than a whole
pickup truck load of manure. Although it will need to be dug in or otherwise
killed in the spring and given time to rot in the soil, it is as nutrient- rich
as most manures. The foot of green grass (which we see serving as a winter
cover crop to protect against wind and water erosion) is only the tip of the
iceberg; the great bulk of organic material is in the dense root systems
which also catch and hold soil nutrients
that would otherwise leach below the root-zones of vegetables. Cover crops,
catch crops, and green manure are different aspects of the same annual rye
grass.
 |
| Green and brown compost materials |
In the
thaws of late winter, once the freeze is out of the soil, I will find a warm
day to turn the green manure into the soil and allow a month for it to
rot. While I wait for the green manure
to rot underground and before I plant any vegetable seeds, I encourage weed
seeds to sprout in the sandy top soil; I actually want a weed patch. This is a
sort of weed genocide. Once the weeds are an inch tall I rake them out. I like
to do this twice before planting my vegetable seeds. This early weed rakings of
weeds goes a long way toward controlling weeds in the garden for the entire
season. What would happen if you planted a watermelon seed six inches deep?
Nothing…the seed would not have enough energy to get a plant to the surface and
would die from lack of sunlight. Likewise when we fight weeds, we only need to
kill the weeds in the top inch of soil, the others are too deep to germinate.
Early raking accomplishes this. Another weed raking occurs between succession
plantings of cool and warm weather crops, killing weeds again before they can
go to seed.
Annual
crop rotation allows the soil a rest from crops which feed heavily on a
particular nutrient, e.g. salad greens feeding heavily on nitrogen. It also
reduces the buildup of garden pests and plant diseases which attack a
particular family of vegetables. To accomplish crop rotation in a postage stamp
garden I suggest simply shifting the entire garden back and forth, north and
south by six foot increments. This can be accomplished by one year building the
compost pile on the north end of the garden and the following year on the south
end. With a small garden it may be easier to just move the entire garden a bit
rather than fool with shifting individual beds.
Finally,
I would like to say a few words about marriage…the marriage of vegetable
growing with vegetable cooking. Folks, if you don’t have someone in the family
who knows how to cook vegetables you have missed the bus! I thought that I did
not like cooked greens until I went to a Chinese restaurant. I thought that I
did not like beets until I went to an Amish restaurant. The French and the
Italians also know how to cook vegetables…and so does my wife. She goes on line
for recipes and reads cook books like I read organic gardening books. Many
times I have shown people around my garden; we had an interesting and
informative exchange of ideas but I never saw anyone’s eyes light up with
surprise. Then we would proceed into the
kitchen to have some cooked vegetables or soup. When the first fork or spoonful
went into their mouth, that is when their eyes popped open with surprise; “Wow,
this tastes really good!” So don’t just learn how to grow vegetables…learn how
to cook them too.
In
discussing these 13 intensive gardening practices to maximize the output from a
small garden I have only scratched the surface of each of these practices,
usually only giving a paragraph or two to topics which would get an entire
chapter in a gardening book. Other practices, such as double digging, I have
not discussed at all. I hope I have piqued your interest enough that you will
go check out and read some of the gardening books in your library. 635 is the Dewey Decimal number for
gardening books. Winter is a good time to read two or three. MY suggestions are:
The Postage Stamp Vegetable Garden by Karen Newcomb
Maximizing Your Mini Farm: Self-sufficiency on ¼ acre
by Brett Markham
Square Foot Gardening by Mel Bartholomew
How to Grow More Vegetables by John Jevons
The Vegetable Gardener’s Bible by Edward C. Smith
Lasagna Gardening by Patricia Lanza
Gardening Without Work by Ruth Stout.
Creating Rich Garden
Soil
If we
want to do the intensive type gardening described in postage stamp gardening,
succession growing two or three crops of vegetables per year, then the soil
must be substantially amended before and after each succession planting in
order to maintain or improve garden soil fertility and productivity. Obviously
soil fertility maintenance is much easier than improving the initial poor soil
to get rich garden soil in the first place. In some ways the corn/ soybean/
wheat rotation farmers of our area use is much easier on the soil than the
practices organic vegetable gardeners employ. Often vegetable growers “strip
mine” their soil using the entire vegetable and all the soil nutrients which
the vegetable has taken up and returning nothing of the plant to the soil. This
would be the case when we make beet root into pickled beets and also use the
greens as cooked greens. Nothing is
returned. The farmer by contrast takes only the grains and returns the vast
majority of his plant nutrients in roots, stalk, husks, and cob to the soil…this
in addition to soybeans taking nitrogen from the air and infusing it into the
soil and the wheat putting down massive root systems. The gardener using
intensive postage stamp gardening must compensate for his strip mining of the
soil both by amending the soil with organic fertilizers and amending the soil
with organic material to enrich the soil and hold soil moisture.
All
bagged fertilizer, organic or chemical, will have on the packaging a series of
three numbers, for example “5-10- 11.” The first of these numbers represents
the percentage of the contents which is nitrogen, the second number shows the
percentage which is phosphorus, and the third number shows the percentage which
is potassium; this series is referred to as the NPK numbers based on the
letters used to represent each of these
elements in the periodic table of elements. So in our example, if you bought a
100 pound bag of this fertilizer you would get 5 pounds of nitrogen, ten pounds
of phosphorus and eleven pounds of potassium. For my garden last year I bought
two twenty-pound bags of organic fertilizer from Rural King; one was a bag of
bone meal which has a NPK of about 1-10-0 and the second was a bag of balanced
NPK, probably about 10-10-10. The 10% nitrogen was a combination of quick release
(i.e. more water soluble) blood meal and slow release feather meal. Anything
which is pure protein like feathers, hair, wool, hoof or horn meal is going to
have a nitrogen content of about 15% and except in the case of blood meal, be
slow release. Sometimes when I go to
Fantastic Sam’s, I take along a plastic bag to get my hair clippings to use as
long-term, slow release nitrogen for my asparagus patch. The phosphorus content
of my bag of fertilizer was mostly bone meal and I believe the potassium was
from potassium rich rock powders.
Commercial bagged organic fertilizer runs
about twice as expensive as commercial chemical fertilizer but this does not
bother my sense of extreme frugality for several reasons. First, organic fertilizer in most cases is
slow- release and lasts a long time, years actually, in the soil compared to
the more water- soluble chemical fertilizer which is fast to leach down below
root level and into underground well water or wash off into streams. Second the
price of organic fertilizer doesn’t bother me for two other reasons: Fathers
Day and my birthday. My daughter finds it much easier to get me a $25 gift card
from Rural King or Farm Bureau rather than trying to figure out what to buy me
at the mall. Besides she knows she will get her money back in tomatoes,
asparagus, watermelons, potatoes and sweet potatoes…we both come out better
off. Lastly, it doesn’t bother me that
organic fertilizer is more expensive than chemical fertilizer because I can
home-manufacture some of my organic fertilizer. Wood ashes from burning downed
tree limbs supplies a lot of potassium, calcium and a fair amount of phosphorus
and trace minerals. Wood, ashes unlike
most other organic fertilizers, is fairly water- soluble and could leach out.
For that reason I put it on my corn and winter squash patch in the spring
rather than the fall at the rate of 5 pounds per 100 sq. ft. Wood ash has
caustic lye which can affect some plants if put on too heavily but the lye also
serves to repel a number of undesirable root worms and plant diseases. It is a
good thing but you don’t want too much of a good thing, so about
5 lb. per 33 feet of 3 ft. wide row. We eat a good amount of eggs and smashed egg shells make another excellent slow- release of nitrogen, calcium and trace minerals that should last for years. One academic did an experiment watering plants with water that had soaked around egg shells and found that it had better effect than either manure tea or compost tea.
5 lb. per 33 feet of 3 ft. wide row. We eat a good amount of eggs and smashed egg shells make another excellent slow- release of nitrogen, calcium and trace minerals that should last for years. One academic did an experiment watering plants with water that had soaked around egg shells and found that it had better effect than either manure tea or compost tea.
So much for organic fertilizers, let’s talk
about organic materials. Grass is an organic gardener’s best friend. Grass is
an organic gardener’s worst enemy. It is
both enemy and friend for the same reason that is because grasses have
unbelievable root systems. Before I sound like I am contradicting myself too
much, let me say that I am speaking about two different kinds of grasses. Cool
weather grasses, grown in late fall and winter as a cover crop, and then turned
under in early spring as green manure are an organic gardener’s best friend.
Cereal grasses such as rye, wheat, oats and annual ryegrass have unbelievable
root systems which add tremendous amounts of organic material to sand, which
allows it to hold water and to clay soil which allows it to drain. These huge
root systems catch nutrients in the soil and prevent them from being leached
down below the vegetable root system level; for this reason, in addition to
being cover crops that protect the garden from wind and rain erosion, and green
manures, cereal grasses can also be called catch crops. I have always felt that
someone who purchased a 3 lb. bag of inexpensive and readily available annual
ryegrass and threw it on the floorboard of their car could put more organic
material into their garden than someone who took a pickup truck load of manure
to his garden. When you dig in grass green manure in the late winter or early
spring, be sure to invert the sod, roots toward the sky, so that it will die
and rot. This rotting process takes about a month but I will address that
process more later on. Obviously, the huge root systems of warm weather grasses
steal all the water and nutrients from your vegetables, as bad as tree roots,
and so must be fought with a sharp hoe from when they first sprout. Grass
clippings in either the compost or worked into the soil are a mixed bag, both
good and bad. Grass does deserve to be called “green manure” since pound for
pound grass has about twice the nitrogen and potassium of cow or horse manure.
Grass lawn clippings can be used as a one inch deep mulch, added to the compost
pile as a nitrogen source or worked directly into the garden soil if they have
not been sprayed with herbicides or pesticides and if they are free of weed
seeds and most importantly, are free of invasive warm weather grasses such as
Bermuda grass, Johnson grass, foxtail, witch grass or crab grass. Crab grass
has been my nemesis. So if you have good
clean blue grass clippings use them but be cautious.
That
pretty well covers the subjects of purchased organic fertilizer and green
manure cover crops; let’s talk about mulch and compost. Let’s begin by banning
the word compost from our vocabulary. Why? Because a lot of your urban
neighbors believe compost draws rats, flies and other vermin. So I not only
want to talk about making compost but also how to hide it from your neighbors.
I suggest that when you talk to urban or suburban neighbors about your garden
use the words organic matter and deep organic mulch instead of compost. We need to understand that all these
different names that we give to amending garden soil are basically one and the
same thing, i.e. organic material which eventually decomposes to humus. If you
lay down an inch or two of organic material such as leaves or straw or dried
grass clippings over the garden that is called an “organic mulch”; If you lay
down 8 to 12 inches, that can be called a “deep organic mulch.” If you lay down
2 feet of organic material, that is usually referred to as “sheet composting”
or cool composting or passive composting. And if you pile organic material 3 to
5 feet deep, that is referred to as a hot or active compost pile. The last one
is what most of us including your neighbors consider to be compost but in
reality mulch, deep mulch, sheet composting and a hot compost pile are really
all a broad spectrum of the same thing , namely organic matter spread out to
different depths. In the long run they all bring about the same soil
enrichment. Mulch can be made into a compost pile simply by raking it up to a 4
foot depth in one pile and likewise a hot compost pile can be hidden in plain
sight by spreading it out to a lesser depth as mulch. Ruth Stout who wrote one
of the early classic organic gardening books entitled “How to Have a Green
Thumb without an Aching Back” describes her no-dig method of gardening as “deep
mulch” throughout the book and only once just happens to mention that her
entire garden was actually a compost pile.
If you
want to disguise your 2- foot deep sheet compost even more, throw 2 or 3 inches
of soil on top of it which will smash it down considerably and plant rye grass
or some other green cover crop on top of the soil while your compost works
underneath through the winter. Another way to hide compost is to lay it,
(especially fall leaves) in your garden aisles and walkways and hold it down
with a little soil and straw to prevent it from blowing away. After a year of
keeping your shoes from getting muddy and being ground underfoot into smaller
particles, these couple inches of walkway top soil can be skimmed off with a
sharp shovel and placed on the growing bed as an amendment. Then the whole
procedure can be begun again. Try this with dried leaves and dried grass
clippings but not wood chips or saw dust because the latter two take too long
to rot and would take nitrogen out of the garden bed.
Compost
can be hidden from the neighbors by burying it; this is what is called trench
composting. Digging in a green manure crop is really nothing more than trench
composting as is the process of double digging which is sometimes referred to
as “trenching.” If you are going to bury household garbage do not bury (or use
in any form of compost) any meat, bones, grease, dairy products, dog or cat or
human manure, bread or dough or pet foods.
Fruit and vegetable peelings, coffee grounds, crushed egg shells,
newsprint, paper napkins are all fine to either bury or add to the compost
heap. A sprinkling of black or red pepper may deter anything from digging up
your compost as will a wide board with a concrete block on it. Finally, a
full-fledged five foot tall hot compost pile can be hidden by planting tomatoes
in cages on the south side, sunflowers and cucumbers on the east and west sides
and either cucumbers or squash on soil on top. With this camouflage of flowers
and vegetables, the compost pile can sit and rot all summer and the plants
surrounding it will love the leaching nutrients from the pile.

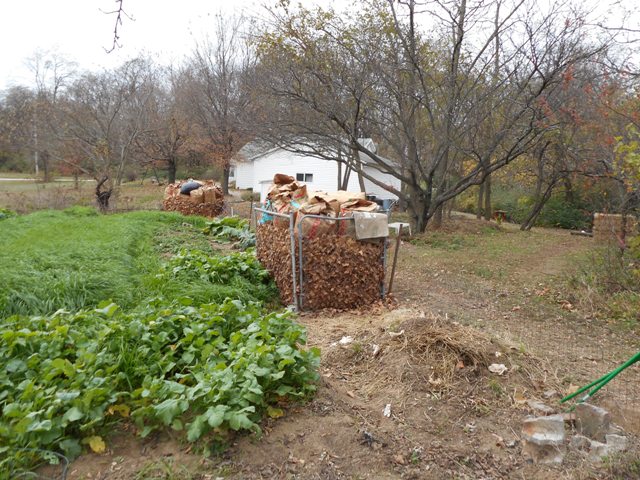
Here is
a picture of my garden taken around Thanksgiving of last year. Can you spot the
compost piles? What colors do you see in the picture? You see brown fenced maple leaves and green
rye grass. “Green” and “brown” are the two nick names given to organic
materials which go into the process of making compost. Green materials are
relatively high in nitrogen and low in carbon. Brown materials are relatively
low in nitrogen and high in carbon. As you can see from this picture in
November, when spring does arrive I should have plenty of both high nitrogen
greens in the form of grass and high carbon brown material in the form of the
previous fall’s leaves to make a hot compost pile. My property and the garden itself are producing the necessary organic materials,
no hauling required. I will simply make
a six inch layer of leaves and straw for my brown material, add a three inch
layer of pulled green grass, top that with an inch of garden soil, water the
pile with a hose and keep repeating the process until the pile is four feet
tall by four feet wide. After this initial hot pile in the spring, other piles
will continually be made from green weeds which grow in my acre of woods,
namely pokeweed, wild mustard, ragweed, stinging nettle, horse weed, and lambs
quarters. Weeds are excellent green materials for the hot compost pile, so long
as they have not yet formed any seed.
Green organic material supplied by the garden itself include spinach and
lettuce which have bolted in early summer heat, corn stalks and water melon
rinds which help heat up midsummer piles, and in late fall and early winter
there are tomato and sweet potato vines, asparagus ferns, and all the green
leaves from my storage winter radishes, turnips etc. Good compost can be produced from these
locally produced greens and brown materials. Often it is just a matter of
choice whether organic material is turned under as green manure, used as mulch,
or composted. How these three processes
are all inter-related and are really the same thing can be seen in how I care
for my melon patch. I dig in the winter cover crop of ryegrass in spring as
green manure and plant my watermelons. Mid-summer, I mulch with wetted newspapers, then top that
with several inches of leaves, and then add about an inch of straw on top the
leaves because the straw keeps the leaves from blowing away in a strong wind.
In fall I rake this summer mulch into windrows (the mulch is brown material)
along with the spent melon vines and melon culls that failed to ripen (this is
my green material), wet these materials with water and add an inch of
soil. I repeat this process of layering
until the windrows or piles are three or four foot high and then let them heat
up and compost down to half their original height. At that point I scrape off
the outsides of the piles and make those outsides the insides of new piles. The
more composted cores of the original piles then become the exterior insulation
for the second set of windrows. This process of raking up the summer’s mulch
into windrows exposes the garden soil which can then be planted into a winter
green manure /cover crop to protect against erosion. I also seed the compost windrows with rye
grass on top of which it grows exceptionally verdant and hides the piles. In conclusion, rather than thinking of mulch,
green manure, and compost as three separate processes, I prefer to consider
them all as being one symbiotic process
and one changing into the other. See how all three are really one broad
spectrum of the same thing and one integrated system.

The
easiest method of soil enrichment is the “no dig, deep mulch” method
which can be as simple and easy as spreading autumn leaves over the garden and covering with a little
soil to keep it from blowing away over winter and then in late spring, raking
the leaves into piles and planting directly into the exposed soil. Once the
soil has warmed and plants have begun to grow, the leaves can be spread again as
mulch. There are several no dig methods which all work if the beds are not
compacted by walking on them and if there is considerable earthworm activity
(at least 10 worms per square foot of garden) to work on dried leaves,
transform the mulch into worm castings and draw the leaf mold down into their
tunnels. Earthworms will plow, aerate, work in organic matter and fertilize
your garden beds for you.
The
hardest and most physically demanding method of soil enrichment is double
digging. Double digging can however work in sync with the easier no-dig method.
A gardener might initially prepare and “fluff” a first-time garden area the
first year which would then allow him to employ the no-dig method for
enrichment for years afterward. Some
gardeners might double-dig a third of their garden every year while others may
double dig initially and then never do so again. There are several methods of
double-digging or trenching as it is also called. What follows is how I plan to
do my beds next year. Across the 3-foot wide face of my garden bed or wide row
I will dig a trench 2 feet wide and one shovel deep and place the soil in a
pile in front of the row. All the gardening books say that this dug topsoil
must be placed in a wheel barrow and moved to the opposite end of the row to
fill in the final trench of the double-digging process, but I find this extra
work unnecessary. I simply go down one
row in one direction and make a “U-turn” at the end of the first row by
trenching in the opposite direction on the next row and end up with my final
trench right next to the initial pile of topsoil. After the first trench is dug
one shovel deep and the topsoil piled, I then dig and loosen the subsoil
another shovel deep but I do not remove the broken up soil from the trench.
Instead I add dried autumn leaves to the loosened soil and mix the leaves in to
form a long lasting “sponge” to hold water during droughts. This leaf mold
sponge will be relatively infertile but that should be OK because 85% of
vegetable roots will be in the top foot of the soil and these are the feeder
roots. Only tap roots going down in
search of moisture should get into this sponge. Besides, nutrients from the top
soil above will leach down into the sponge. After the leaf mold is dug into the
topsoil, I will then skim off the green manure turf from the next 2 feet of bed
and invert that turf into the trench. Next I skim off the green manure turf
from the walking path and invert that into the trench. Next I dig one shovel
deep of top soil and place that on top of the turf in the trench. At this point a second trench has automatically
been dug from the filling in of the first trench and I can again loosen the
subsoil of the second trench one shovel deep and mix in several inches of dried
leaves to continue my underground sponge.
I repeat this process over and over until the entire bed has been
trenched then I cover the row with an inch of compost which I work into the top
4 inches of topsoil. At this point I have a well- worked soil with several
inches of leaves worked into the bottom 10 inches of subsoil, 5 inches of
buried decaying grass turf and 5 inches of compost- enriched topsoil. I allow these prepared beds to sit for about
three weeks to allow the buried turf to decay and to encourage weed and wild
grasses to sprout and show their heads so that I can rake them out and have a
weed-free top two inches of soil for my vegetable seed. Weed seed deeper than a
couple inches will not be able to sprout and reach the surface so I should have
a fairly weed free vegetable bed. The leaf mold water sponge should last for
years. It is important to remember that this significant garden soil enrichment
process was done on the cheap; only about $6 worth of annual ryegrass seed for
the green manure crop over a 2500 sq. ft. of garden. There was however
considerable physical labor involved so it is only worthwhile for me to trench
one third of my garden beds in any one year.
Trenching is worthwhile for establishing rich soil but there are much
easier ways to maintain garden fertility, especially if you have earthworms.
The Storage of
Vegetable Garden Produce
 |
| End of season harvest |
We do
not can vegetables. It seems way too much work. Besides, in case of natural
disasters all those Mason jars would end up as broken glass on the pantry
floor. I do believe in metal canned
goods and bottled water in a pantry as a store against a natural disaster but
those are bought in a grocery store and have nothing to do with storing our
garden produce.
We do
freeze a few vegetables, but only those which require very little preparation
for freezing. We flash freeze blue berries, strawberries, sliced rhubarb, lots of green beans, chopped bell peppers,
lots of shredded zucchini, a few freezer pickles, but that is about the extent
of our frozen garden produce. Freezing shredded zucchini stores the tremendous output from that plant and allows us to
make cake-like zucchini breads throughout the fall and winter. Family and
friends seem to love it as gifts and our offering at pot luck meals. The blue berries, strawberries, and rhubarb
also end up making dessert items during the cold weather months. The green
beans are our favorite side dish in winter plate lunches and the frozen bell
peppers are easily sautéed with onions and incorporated into winter
omelets. In the past we have frozen
sweet corn but that entails a lot of work and we just end up putting the corn
in soups anyway. The only vegetable
which we keep growing in the garden overwinter is kale which makes either
winter salads or sides of cooked greens with chopped onions.
By far
most of our garden produce keeps naturally either in plastic laundry baskets in
our cool utility room, or in leaf and sand filled rubber maid tubs in our
unheated garage. In the utility room, the coolest room in our home, we store
two to four baskets each of Yukon Gold white potatoes, Beauregard sweet
potatoes, Waltham butternut winter squash, and red onions. We also keep a
refrigerator crisper full of the red onions where they continue to keep even
after the laundry basket of onions in the rear room are used up in January. The
rectangular shaped laundry baskets allow for good air flow ventilation through
the produce and stack neatly onto shelving without wasting room. We keep the
white potato baskets covered with linens to keep them from sprouting or turning
green. Neither green potatoes nor potato sprouts are edible. If sprouts do form
on the potatoes, break them off and discard or the potatoes will wither. In
addition to the aforementioned vegetables, we also like to keep a couple card
board boxes with a couple layers each of newsprint- wrapped after-frost green
tomatoes. For a couple months in the fall we eat these either as ripened red
tomatoes or fried green tomatoes.
In our
unheated garage I put a layer of fall leaves and then a layer of my sandy
garden soil and then a layer of carrots, beets, turnips or Green Meat winter
radishes and repeat the process until the rubber maid container is full. The
carrots keep through the winter under these conditions but not all varieties of
winter radishes do. I have had icicle radishes stored this way rot, so I
emphasize the variety called Green Meat. I keep some turnips stored in the
garage and some in the utility room so that if one basket does not keep the
other will. I like to grate the Green Meat winter radishes with the carrots to
make winter cole slaws to go with green beans from the freezer and boiled white
potatoes or baked sweet potatoes yams. A
lot of winter soups can also be made from this store of natural keeper
vegetables. Check your store of keeper vegetables periodically and use any that
go bad as fodder for the compost pile. Nothing is wasted. It feels assuring to know there are hundreds
of pounds of food stored in the back room.
Cooking and Recipes:
Good cooking and good recipes are
essential to enjoying garden produce. Here are a few of my wife’s favorites.
Many more can be found from the internet.
Desserts:
Rhubarb Blueberry crisp
4-6 servings
Ingredients
·
3 cups chopped fresh or frozen
rhubarb
·
2 cups fresh or frozen blueberries
·
1/2 cup sugar
·
2 tablespoons all-purpose flour
·
TOPPING:
·
1/2 cup packed brown sugar
·
1/3 cup all-purpose flour
·
1/4 cup cold butter
·
1/2 cup slivered almonds, toasted
(Pecans and walnuts can be substituted)
Directions
·
1. In a large bowl, toss rhubarb and blueberries with
sugar and flour. Transfer to a greased 2-qt. baking dish.
·
2. In a small bowl, combine brown sugar and flour; cut in
butter until mixture resembles coarse crumbs. Stir nuts. Sprinkle over fruit.
·
3. Bake at 350° for 1 hour or until bubbly. Serve
warm. Yield: 4-6 servings.
Rose’s Zucchini Bread
3 cups
all-purpose flour
1 teaspoon
salt
1 teaspoon
baking soda
1 teaspoon
baking powder
3 teaspoons
ground cinnamon
3 eggs
1 cup
vegetable oil
2 ¼ cups
white sugar
3 teaspoons
vanilla extract
2 cups
grated zucchini
1 cup
chopped walnuts (optional- you can leave out nuts or substitute pecans or
raisins)
Directions:
1. Grease
and flour two 8 by 4 inch loaf pans. (regular size loaf pans)
(Optional*-After I grease and flour pans, I
line bottoms of pans with wax paper. The
bread comes out of the pans easier.
Preheat oven to 325 degrees F.
2. Stir
together flour, salt, baking powder, soda, and cinnamon together in a bowl.
3. In
another large bowl beat eggs, oil, vanilla, and sugar together.
4. Add dry
ingredients to the creamed mixture and beat well. Stir in zucchini and nuts until well
combined. (Dough will be stiff)
Pour batter
into prepared pans.
5. Bake for
40-60 minutes (I usually bake it 60 minutes or until toothpick or butter knife
inserted in bread comes out clean)
Cool in pan
on rack for 20 minutes.
Remove bread
from pan and completely cool loaves before wrapping.
Or eat warm!
Enjoy!
Sweet
Green tomato pie
Pie
filling:
3/4 cup
packed light brown sugar
1/2 cup granulated sugar
6 tablespoons all-purpose flour
1 teaspoon ground cinnamon
1/8 teaspoon salt
4 cups finely chopped green tomatoes (I like to put tomatoes in colander to let any extra juice to drain out)
1 tablespoon fresh lemon juice
9 inch pie crust
1/2 cup granulated sugar
6 tablespoons all-purpose flour
1 teaspoon ground cinnamon
1/8 teaspoon salt
4 cups finely chopped green tomatoes (I like to put tomatoes in colander to let any extra juice to drain out)
1 tablespoon fresh lemon juice
9 inch pie crust
Topping
for pie:
Mix until
crumbly
1 cup
all-purpose flour
½ firm
margarine or butter
½ cup
packed brown sugar
Directions:
Preheat the oven to 425 degrees F.
-In a large bowl, mix together the brown sugar, granulated sugar, flour, cinnamon, and salt.
-Sprinkle
2 tablespoons of the flour mixture across the bottom of the prepared piecrust.
-Add the tomatoes and lemon juice to the bowl with the remaining flour mixture and toss to coat. Spoon the tomato mixture into the pie shell and sprinkle on topping. ( I crimp strips of foil around the pie crust edges to keep crust from burning)
Bake for 15 minutes, then reduce the temperature to 375 degrees F. Bake until the topping is golden brown and the filling is bubbly, 35 to 40 minutes. Remove from the oven and cool on a wire rack for at least 1 hour before serving.
* Cover
topping with foil for last 10 minutes to keep topping from getting too brown.
Serve warm or at room temperature.
Butternut
squash soup
Ingredients
4-6
cups butternut squash cubed ( 1 large or 2 med. Squash)
- 2 tablespoons butter
(or combination of oil and butter)
- 1 medium butternut squash-peeled, seeded and cubed
- 1 small onion, chopped
- 1 stalk celery, chopped
- 1 medium carrot, chopped
- 1 (32 fluid ounce) container chicken stock
- Clove of garlic, peeled and sliced thinly
- Pinch of thyme, sage, red pepper flakes (to taste)
- salt and freshly ground black pepper to taste
Directions
1.
Melt the butter in a large pot, and
cook the onion, celery, carrot, garlic, and squash about 5 minutes (careful not to burn garlic because
then it will taste bitter).
2.
Add spices. Pour in enough of the chicken stock to cover
vegetables. Bring to a boil. Reduce heat to low, cover pot, and simmer 40
minutes, or until all vegetables are tender.
3.
Transfer the soup to a blender, and
blend until smooth. Return to pot, and mix in any remaining stock to attain
desired consistency. Season with salt and pepper.
Curried
Carrot, Sweet Potato, and Ginger Soup (5 servings)
·
2 teaspoons canola oil
·
1/2 cup chopped onions
·
3 cups (1/2-inch) cubed peeled sweet
potato
·
1 1/2 cups (1/4-inch) sliced peeled
carrots
·
1 tablespoon grated ginger
·
2 teaspoons curry powder
·
3 cups fat-free, less-sodium chicken
broth
·
1/2 teaspoon salt
-Heat oil in a large saucepan over medium-high heat.
-Add onions; saute 3 minutes or until tender.-
Add potato, carrots,
ginger, and curry; cook 2 minutes.
-Add broth; bring to a boil. Cover, reduce heat, and simmer
25 minutes or until vegetables are tender; stir in salt.
-Pour half of soup in a food processor; pulse until smooth.
Repeat procedure with remaining soup.
Zucchini enchiladas
Preheat oven
to 350 degrees
Grease bottom of 9 by 13 inch pan
1 dozen corn tortillas
1 pound lean ground beef
1 onion, minced
3-4 cups grated zucchini
1 small can diced green chilies
2 cups Monterey Jack cheese, shredded
2 ½ cups sauce(2 cans)
-Warm tortillas in microwave or warm
on griddle until tortillas are pliable
-Brown ground beef and onion in a
large frying pan
-Add zucchini and peppers and sauté
about 5 minutes more
- Spoon ground beef mixture into
tortillas, roll up, and place in baking pan.
-Pour enchilada sauce over tortillas
-Sprinkle on the cheese and bake 15-20
minutes. (Until heated throughout and cheese melted)
EASIER VERSION**
-Put one layer of tortillas on the
bottom of baking pan
-Spread ground beef-zucchini mixture
on top of tortillas
-Top with another layer of tortillas
-Pour on sauce and top with cheese
-Bake
* You can also add green peppers or
salsa to the ground beef mixture too. Or add a little of the enchilada sauce to
the mixture for extra flavor.
Zucchini Boats
Ingredients
·
4 small zucchini
·
2 tsp. olive oil
·
1 small onion, chopped
·
½ to 1lb ground sausage (or you can use ground beef)
·
1/4 tsp. salt
·
1 1/4 c. marinara
sauce
·
1 c. shredded
mozzarella
·
Chopped parsley ,if
desired
Directions
1. Cut zucchini lengthwise in half; scrape out and chop flesh,
leaving 1⁄4 inch shell.
2. In 10-inch skillet, heat olive oil on medium-high. Add chopped
zucchini, onion, sausage, and salt. Cook until sausage is done, breaking up
with back of spoon.
3. In 3-quart baking dish, spread marinara sauce; arrange zucchini
shells on top, cut sides up. Spoon sausage mixture into shells. Top with
shredded mozzarella. Cover with foil; bake in 450°F oven 30 minutes. Uncover;
bake 5 minutes. Garnish with parsley.
German potato salad
Ingredients:
4 medium round red or white potatoes (1 1/3
lb)
3 slices bacon, cut into 1-inch pieces
1medium onion, chopped (1/2 cup)
1 tablespoon Gold Medal™ all-purpose flour
1 -2 tablespoon sugar (to taste)
½ teaspoon salt
¼ teaspoon celery seed
Dash pepper
½ cup water
¼ cup white or cider vinegar
Directions:
·
Place potatoes in
3-quart saucepan; add enough water just to cover potatoes. Cover; heat to
boiling. Reduce heat to low. Cook covered 30 to 35 minutes or until potatoes
are tender; drain. Let stand until cool enough to handle. Cut potatoes into
1/4-inch slices.
·
In 10-inch
skillet, cook bacon over medium heat 8 to 10 minutes, stirring occasionally,
until crisp. Remove bacon from skillet with slotted spoon; drain on paper
towels.
·
Cook onion in
bacon fat in skillet over medium heat, stirring occasionally, until tender.
Stir in flour, sugar, salt, celery seed and pepper. Cook over low heat,
stirring constantly, until mixture is bubbly; remove from heat.
Sweet
potato fries
·
2 large sweet potatoes, peeled, cut into 1x3-inch wedges
·
3 tablespoons olive or vegetable oil
·
1/2 teaspoon sea salt or regular salt to taste
·
1/2 teaspoon freshly ground black pepper
·
1/4 teaspoon paprika
·
1/4 teaspoon garlic powder
Directions
- Position
rack in upper third of oven and preheat oven to 425 degrees F. Grease foil lined baking sheet.
- Place
sweet potatoes and oil in large bowl, toss lightly. Sprinkle with salt,
pepper and paprika.
- Arrange
potatoes in a single layer on prepared baking sheet, being sure not to
overcrowd.
- Bake
until tender and golden brown, turning occasionally. Cooking time is 18 to
24 minutes. Cool 5 minutes before serving.
Old-fashioned fried green tomatoes
·
4 large green tomatoes
·
2 eggs
·
1/2 cup milk
·
1 cup all-purpose
flour
·
1/2 cup cornmeal
·
Optional spices-
garlic powder , paprika, or southwestern spice mix spices to taste
·
½ -1 teaspoon salt
·
1/4 teaspoon ground
black pepper
·
vegetable oil for
frying
Directions
- Slice tomatoes 1/2 inch thick.
Drain on paper towels .
- Whisk eggs and milk together in
a medium-size bowl.
- Scoop flour onto a plate. Mix cornmeal
and salt and pepper (and other spices)on another plate.
- Dip tomatoes into flour to
coat. Then dip the tomatoes into milk and egg mixture. Then dip in
cornmeal mixture to coat.
- In a large skillet, pour
vegetable oil (enough so that there is 1/2 inch of oil in the pan) and
heat over a medium heat. Place tomatoes into the frying pan in batches of
4 or 5, depending on the size of your skillet. Do not crowd the tomatoes,
they should not touch each other. When the tomatoes are browned, flip and
fry them on the other side. Drain them on paper towels.
Easier Fried green
tomatoes
4-6 green tomatoes
Salt and pepper
Cornmeal
Vegetable oil for frying
-Slice tomatoes ¼- ½ inch thick
-Salt and pepper to taste Dip in cormeal
-Fry in hot oil about 3
minutes or until golden brown on bottom
-Turn and fry other side
-Drain on paper towel